5.5. Virtual Terminal

Overview

Virtual terminal (VT) is a technological solution that allows to process transactions from Merchant’s personal account on User Interface. This feature doesn’t require Merchant’s API integration to Elecsnet. VT immediately provides a full-featured payment manager’s workplace. VT is used for remote processing of transactions without the presence of a customer, for example, if the customer places an order or pays for services while being in another city or country. VT workflow is fully customizable in order to meet the business needs. Flexible templates will help to minimize time of filling all the customer details. The Virtual terminal supports recurring payments (by recurring ID). If the customer provided cardholder data to Payneteasy processing system before, and the Merchant registered such payment to get recurring ID, future payments can be made with recurring ID instead of cardholder data. VT also allows to generate a link for the customer to submit cardholder data in the secure environment, and, if needed, pass 3-D Secure validation.

VT provides a secure way of processing MOTO transactions with support of asymmetric cryptography. In order to do so please, Generate A Pair Of Public And Private Keys and then pass public key to Elecsnet support and upload the private key in Browser Console (Import Private Key To Browser Console) or User Interface (Import Private Key To User Interface).
The available operations for VT are:

• accepting payments from both new and previously registered customers (Sale);
• hold funds from both new and previously registered customers (Preauth);
• transfer of funds from card to card, both for new and previously registered customers (C2C (Card To Card) Transfer);
• issuance of funds to the cards of both new and previously registered customers (D2C (Deposit To Card) Transfer);
• transfer of funds from one bank account to another (Payout).

The screen is located in Tools – Virtual terminal (VT).

../_images/enter.png

Asymmetric Cryptography

The big advantage of the new Virtual terminal is the use of an asymmetric cryptography system. Asymmetric cryptography, or public-key cryptography, is a cryptographic system that uses pairs of keys: public keys which may be disseminated widely, and private keys which are known only to the owner. The generation of such keys depends on cryptographic algorithms based on mathematical problems to produce one-way functions. Effective security only requires keeping the private key private; the public key can be openly distributed without compromising security.

The Virtual terminal becomes personalized. The user signs transaction request with his private key and the system uses the public key to verify that request is made by the owner of the corresponding private key.

Generate A Pair Of Public And Private Keys

Virtual terminal requires a pair of public and private keys from user to authorize requests. To generate it, go to https://www.openssl.org/ ( https://slproweb.com/products/Win32OpenSSL.html ), download the latest openssl version and run the following commands:

openssl genpkey -algorithm RSA -out private_key_pkcs_8.pem -pkeyopt rsa_keygen_bits:4096

openssl rsa -pubout -in private_key_pkcs_8.pem -out public_key.pem

Please, do not share private key with anyone, it is confidential information for private use only. In contrast, public key must be passed to Elecsnet for endpoint configuration. Please use different keys for production and testing environments to avoid compromise.

PKCS #8 RSA unencrypted private key in PEM format starts with —– BEGIN PRIVATE KEY —– text. This key must be imported to Browser Console or User Interface. See details below.

Import Private Key To Browser Console

Private key is imported into browser’s IndexedDB using a script associated with the currently opened page. This script only uses plain browser APIs (WebCrypt API, IndexedDB API) and does not use any external scripts to avoid the private key being compromised.
Import sequence is:
1. Open https://pay.elecsnet.ru/paynet-ui/login-step1 page in a browser(Do not login to the system).
2. Open the browser console. In Chrome, it is done with Ctrl+Shift+J. In Safari, it is done with Ctrl+Shift+I, Ctrl+Alt+C. For Mac - Cmd instead of Ctrl.
3. Replace the demo key below with real private key in PEM format (it must have —–BEGIN PRIVATE KEY—– prefix in the beginning).
var privateKeyPem = `-----BEGIN PRIVATE KEY-----\
     MIIEvQIBADANBgkqhkiG9w0BAQEFAASCBKcwggSjAgEAAoIBAQDJzUVnqQhDWF2H
     pxAMcyo7f+ucIEJS3AQHG0ET/dxJ0qssGymIjdzelJ3XI+oTq2y9TTimQjtujoeh
     6zl44WrXCbJLCUDWsNjlh7hmBorpU6tJVhw1466CAxkktPJHkMqJYF0efegIfOwU
     otTzwY4tGlN6iWK0aMJ5ZWhWpZDbgap72vrRXKfCN6/JeTUdsOI7PAeZw0me04jZ
     8Lova9FVIbVzOJaFGwSUroMvXevIB8rOD57c3VCLTxE3aGNMz+9DLl6GCm8WZ1US
     HmiHybqgvGLyQswBPFcVzFgd7BpgZs+JAzYDh8ZGANvjA5F9u0b6Ynb3Mpm3+9Rl
     CtvSxKwpAgMBAAECggEAZ6+hro5KIZggjleHRm5Rz7p9S33DtiE3rJMTT/tKmV+1
     9XaLU49YYcDIjMb2OV8GAwnPRpWXRcnT5J0grXxc0do4kpdRij3ZY63lT/6ilxoX
     Uxn8aq/udPy0iYizR5QcjJNHpSgZ9WqCPmQfuJLFw2TYaYh3f6yn54n0Hzj4gd9l
     tsol4xeTKQ47c/vUF7kHfD8IYzL8jv3a3++IqzCwJ3jIpTENsBYAgrkbYN9f9GHD
     BvX3sz6tgFaYU2R8YbDvA0Yq9tVPwYrPvbhwoht6PsjE/R0UK6yqnKPEADdzWvP8
     frXmmtJ35rAymqUWfpqx9RdZ0NMR7J8ut8C5365PJQKBgQD+UidVWut7d9qvhZKq
     +T5qtasH5qkD34idFl4Ay8xsSntqTrXr7q1Ff+FQY6R+f/8IzB4ZqgnV58+8AEMc
     gJzNmkf9L119SCQDxRV/TgW2eHrUrI9XS2AI5tmyzaGY1xL4fCQQMvqNAGERT6sS
     XJRt8WjuGmE4zeqxNB0XY7u1OwKBgQDLIlnksOrPw00lWUbXHSHwdfBzjYU97KVu
     GnOl5fsCmlKanqHUfd/4StnRXpl3l56hig8mYsHV5EcfUEX98PaSbTAy8Lk5y5E9
     ye2ENOgl/IyMgHPtT6spFKm7jRmpulqG4FVCGxQl3n6/nSmztA3S1zLZzi0guI0E
     oxXCbG796wKBgC8NSgOrr5eHRClnIAyL0nVxqPPsQ+bYi3Dsu3WQPwDmAtFXQKcm
     4F3UW/5AgSV6Ttf007jR0cIGglN5BPGYBeqwGZOJGNXd6/PambCU4c+xmKASUO7I
     njrnYu2Gx9f8KqFYbl+k3uAJauwF/lOGV1vD5zLuJICa8Enap2s1Y3wTAoGBAKrx
     QnLISyIB+XbXtVyrYHdJ2Mp1Ks6cye5pBi9y5RQgqCkEG62FLCh3XOvrTvysNEs+
     slccPoBv9UYtuGjmEanRhwEnQMiZPaWgu2dJWp8081X9dxEavS/5+oghSpphf3MH
     b9gMj5z6qvE3IfPfLs7iWCGgdquVgt6HG3Wc6J53AoGAc+ZYE8kMj2p9rtu1uJgX
     +VMbbdLEUqz3BPC9Tzq+eglUlYmwUK1xynKZfkEMcu5PncaBaNLU+GmYKKgw6wZS
     soEF1KvbBB4o6nZdlGo0BirOQ0ijHDWUvtuiaaWAQoQAhQwgqqV2IOC4UfkZ6ORf
     A/UW43A9wZq9kaEgb0YWOes=\
     -----END PRIVATE KEY-----`;

// Algorithm Object
var algorithmKeyGen = {
  name: "RSASSA-PKCS1-v1_5",
  // RsaHashedKeyGenParams
  modulusLength: 2048,
  publicExponent: new Uint8Array([0x01, 0x00, 0x01]),  // Equivalent to 65537
  hash: {
    name: "SHA-256"
  }
};

function parsePem(pemString, type) {
    const expectedPrefix = "-----BEGIN " + type + "-----";
    const expectedPosftix = "-----END " + type + "-----";

    pemString = pemString.trim();
    if (!pemString.startsWith(expectedPrefix)) {
        throw "Expected PEM to start with " + expectedPrefix;
    }
    if (!pemString.endsWith(expectedPosftix)) {
        throw "Expected PEM to end with " + expectedPosftix;
    }
    const base64 = pemString.substring(expectedPrefix.length, pemString.length - expectedPosftix.length).trim();
    return Uint8Array.from(atob(base64), c => c.charCodeAt(0))
}

function parsePrivateKeyPem(pem) {
    return parsePem(pem, 'PRIVATE KEY')
}

function storePrivateKey(privateKey) {
    var request = indexedDB.open("keys");

    request.onupgradeneeded = function() {
      // The database did not previously exist, so create object stores and indexes.
      var db = request.result;
      var store = db.createObjectStore("privateKeys", {keyPath: "name"});

      // Populate with initial data.
      store.put({name: "first", key: privateKey});
    };

    request.onsuccess = function() {
      db = request.result;
    };
}

var privateKeyArray = parsePrivateKeyPem(privateKeyPem);
var NON_EXTRACTABLE = false;
window.crypto.subtle.importKey("pkcs8", privateKeyArray, algorithmKeyGen, NON_EXTRACTABLE, ['sign'])
.then(function(privateKey) {
        storePrivateKey(privateKey);
        privateKeyPem = null;
        privateKeyArray = null;
    }
);
4. Copy this script content and paste it into browser console.
5. The key has been imported in a non-extractable manner.

Warning

If private key have been integrated into the browser, but it is impossible to make a transactions, please, clear browser’s cache and try again to integrate the private key.


Note

If the proposed code is not suitable or if more information is required about the Web Crypto API, please visit the official site https://developer.mozilla.org/en-US/docs/Web/API/Web_Crypto_API.

Import Private Key To User Interface

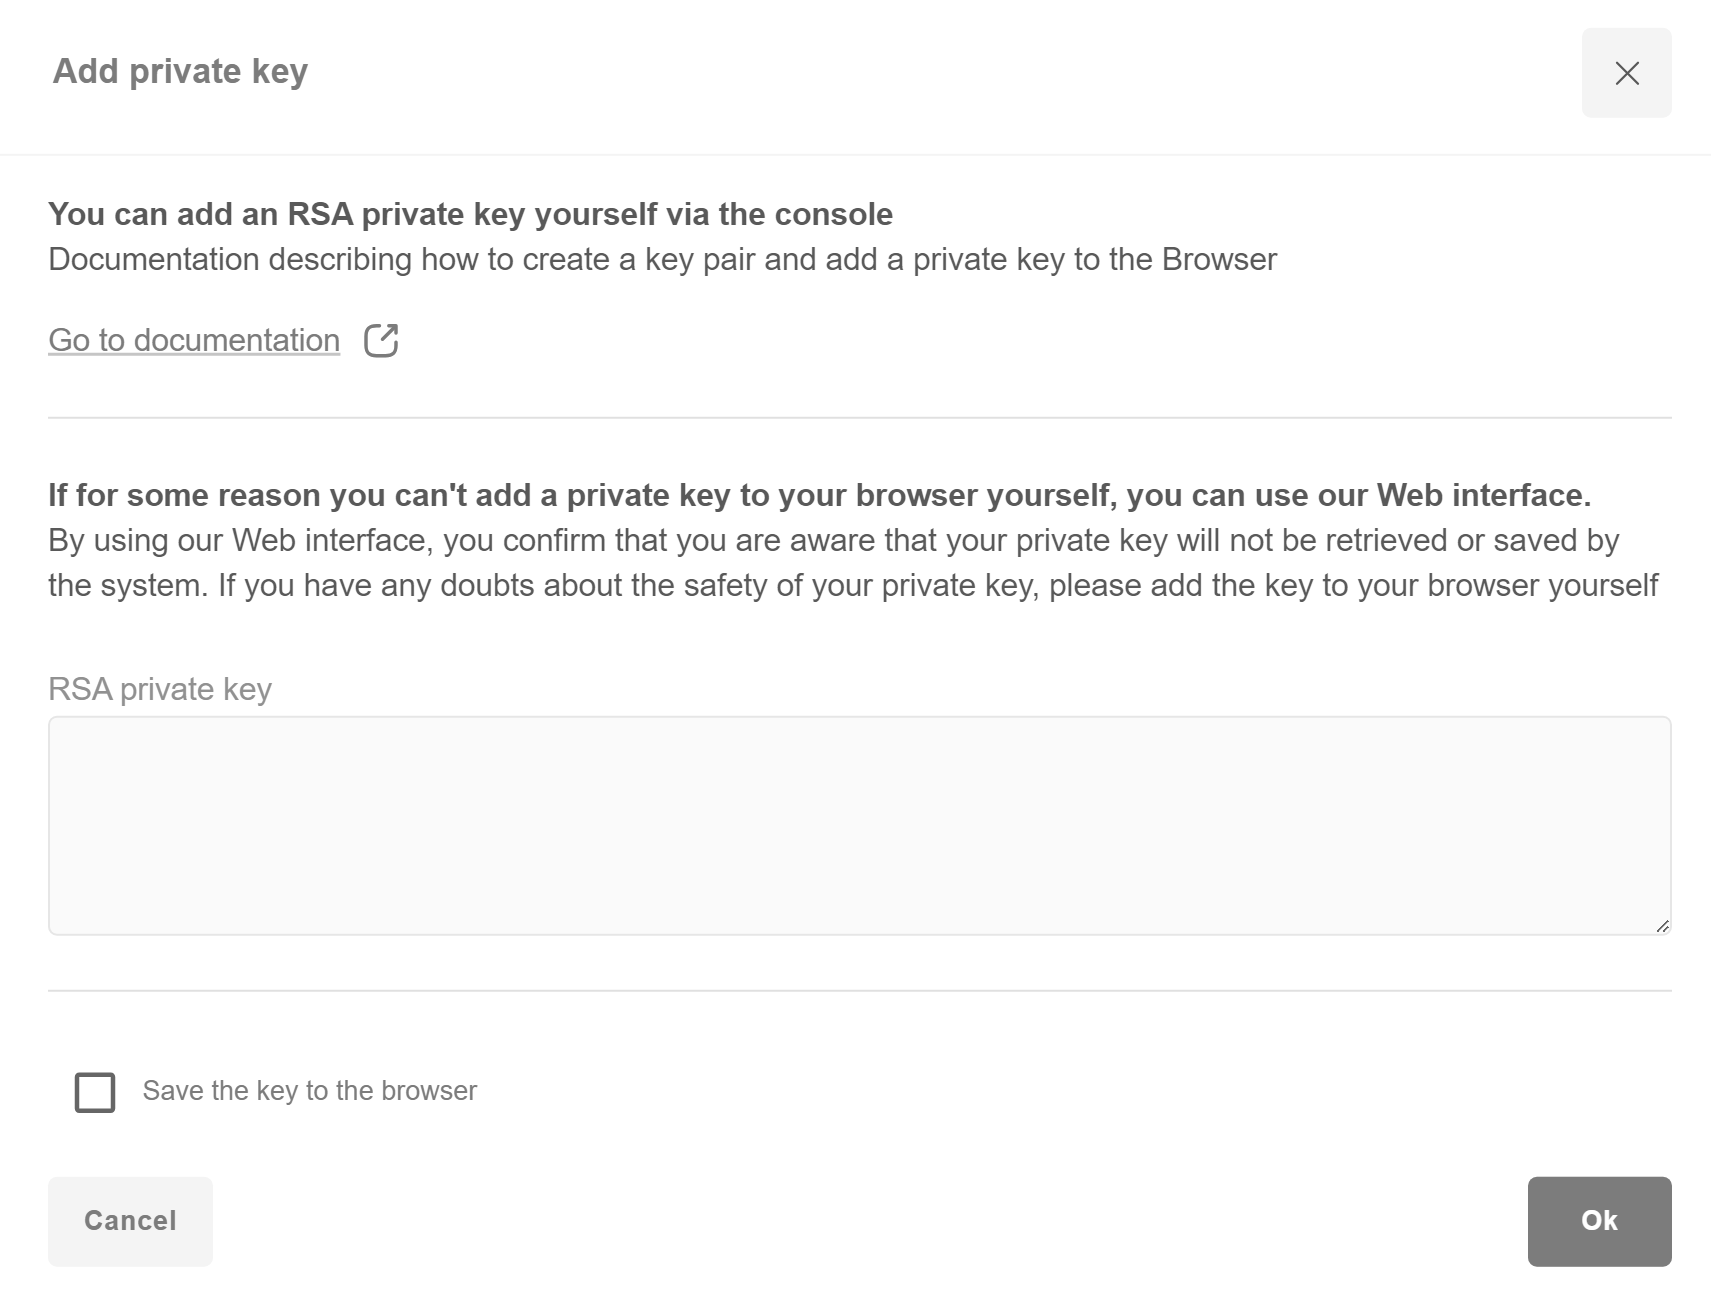
The Virtual terminal has the function of using a private key through the user interface

../_images/add_private_key_1.png

In order to faster conduct a large number of test transactions, please check the “Save key in the browser” box, and the private key will be automatically saved in the browser.

../_images/add_private_key_2.png

VT Interface Details

The VT has control buttons, which are described in more details below.

icon - Adding a private key icon - Copy link
icon - Hide sealed fields icon - Show sealed fields
icon - Save template icon - Default template
icon - Unseal the field icon - Seal the field
icon - Clean all unsealed fields icon - Required fields

Template Management

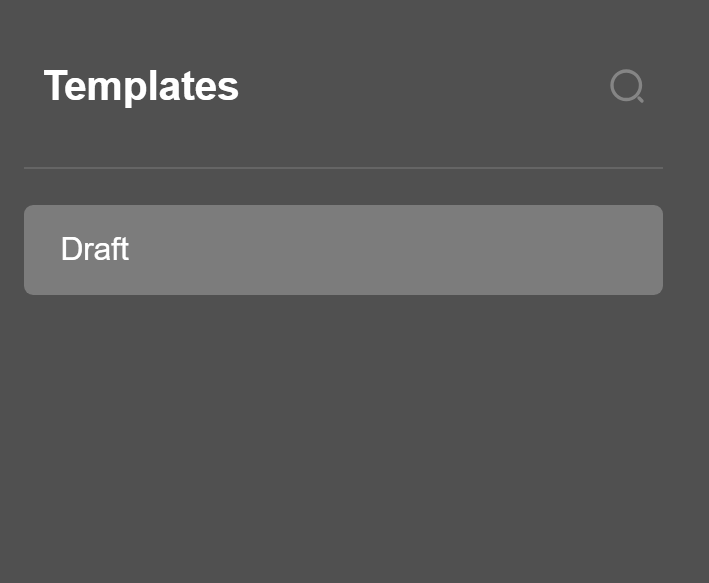
1) To simplify the work of the Virtual terminal operator, data fields can be saved as a template. Using templates allows to work only with the individual attributes of the client.

../_images/create_template_step_1.png

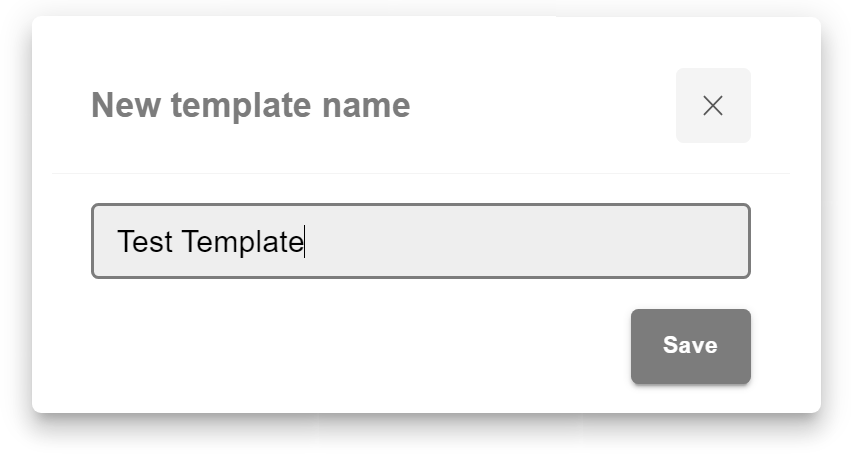
2) After entering data on the right side of the page, it is possible to save this data as a template by clicking ‘save as a template’ and naming the new template.

../_images/create_template_step_2.png

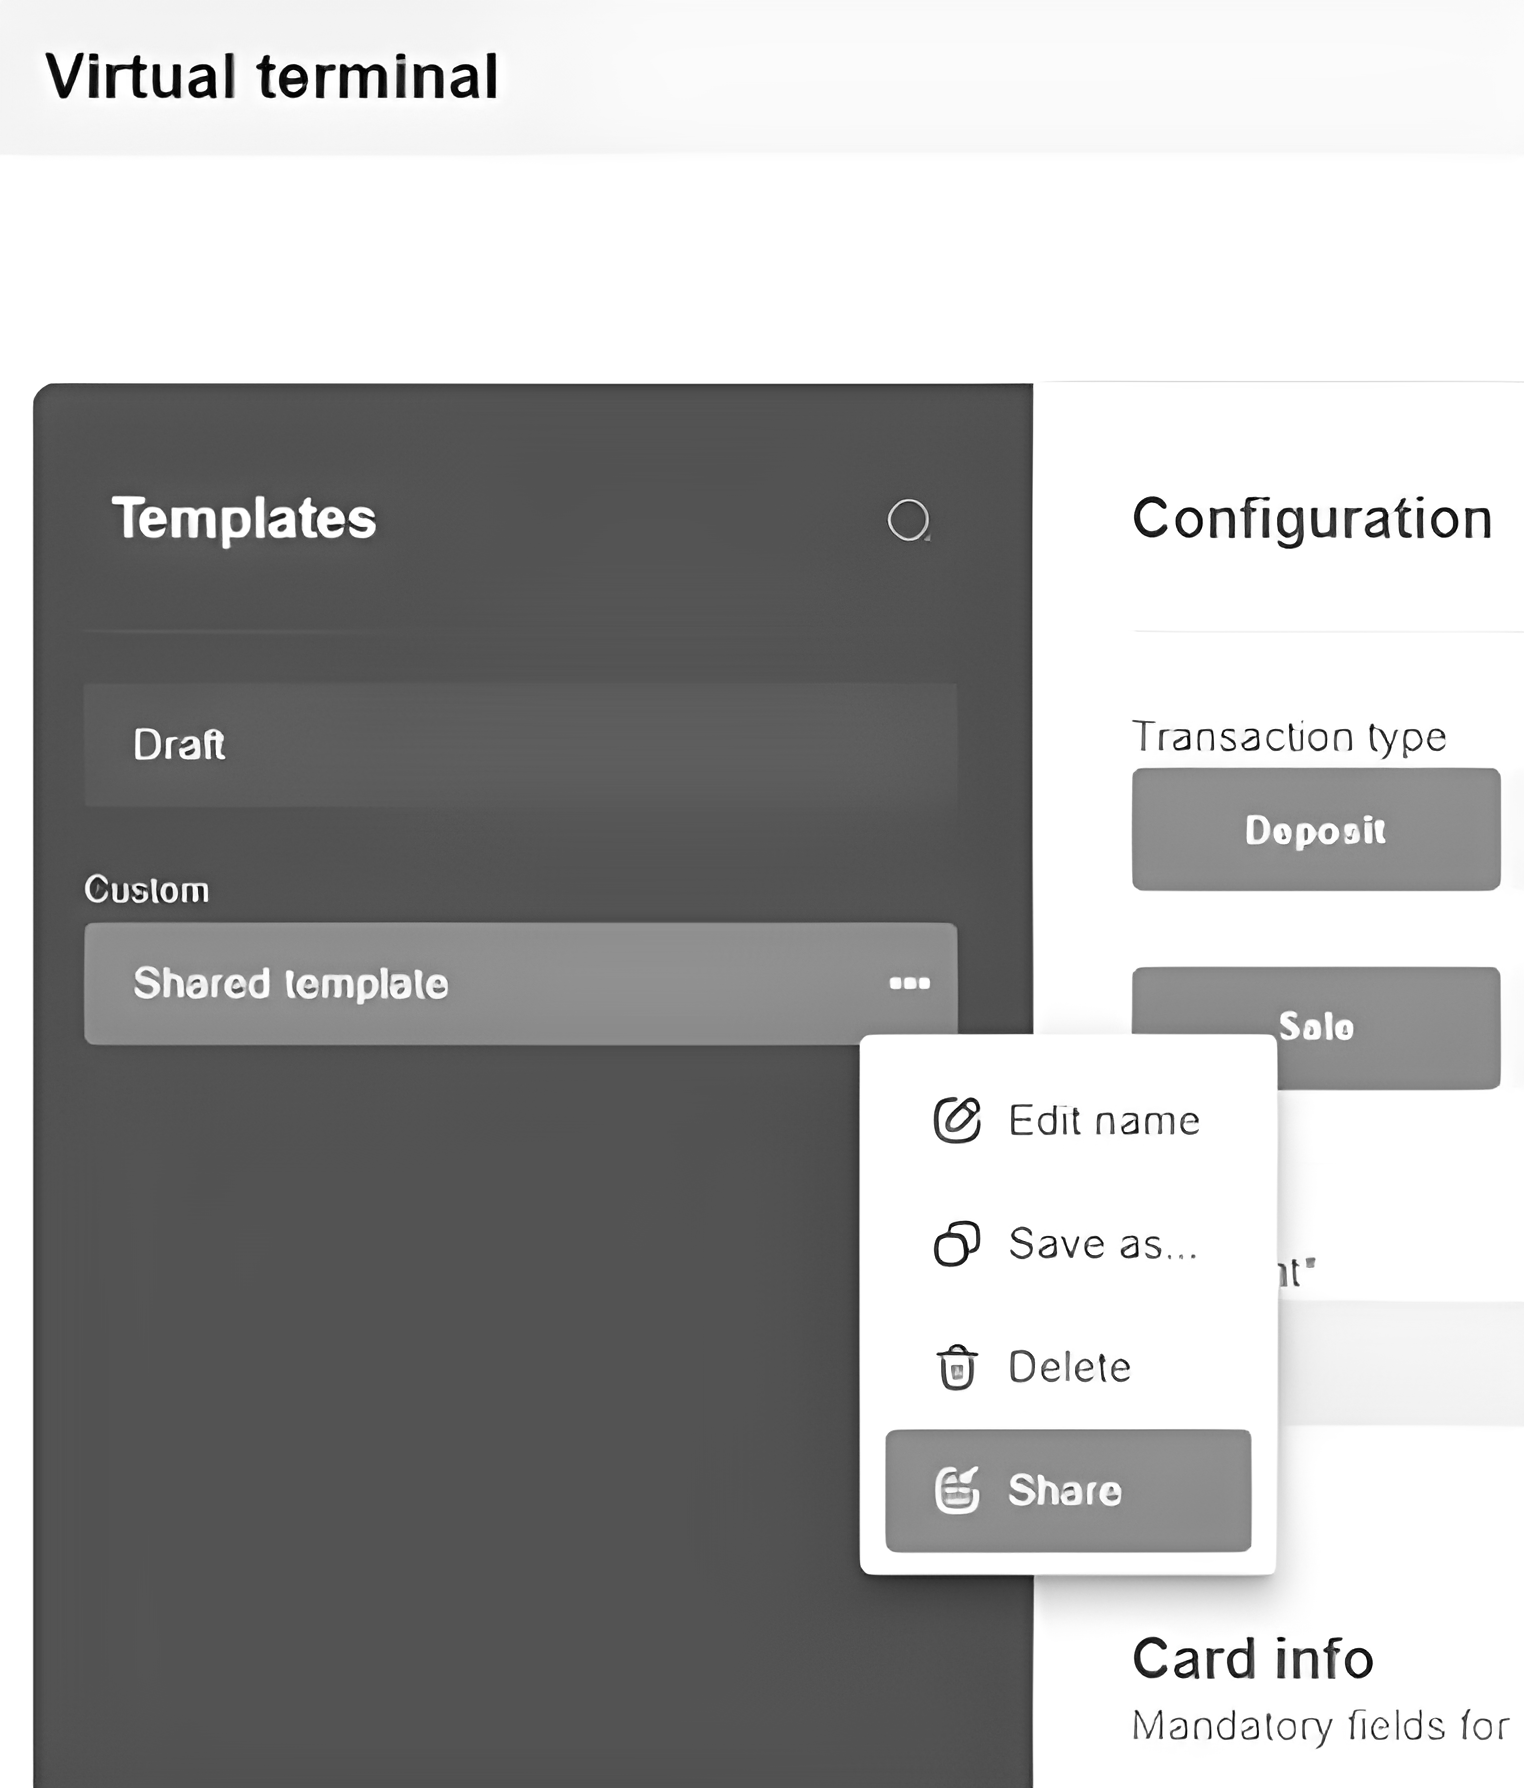
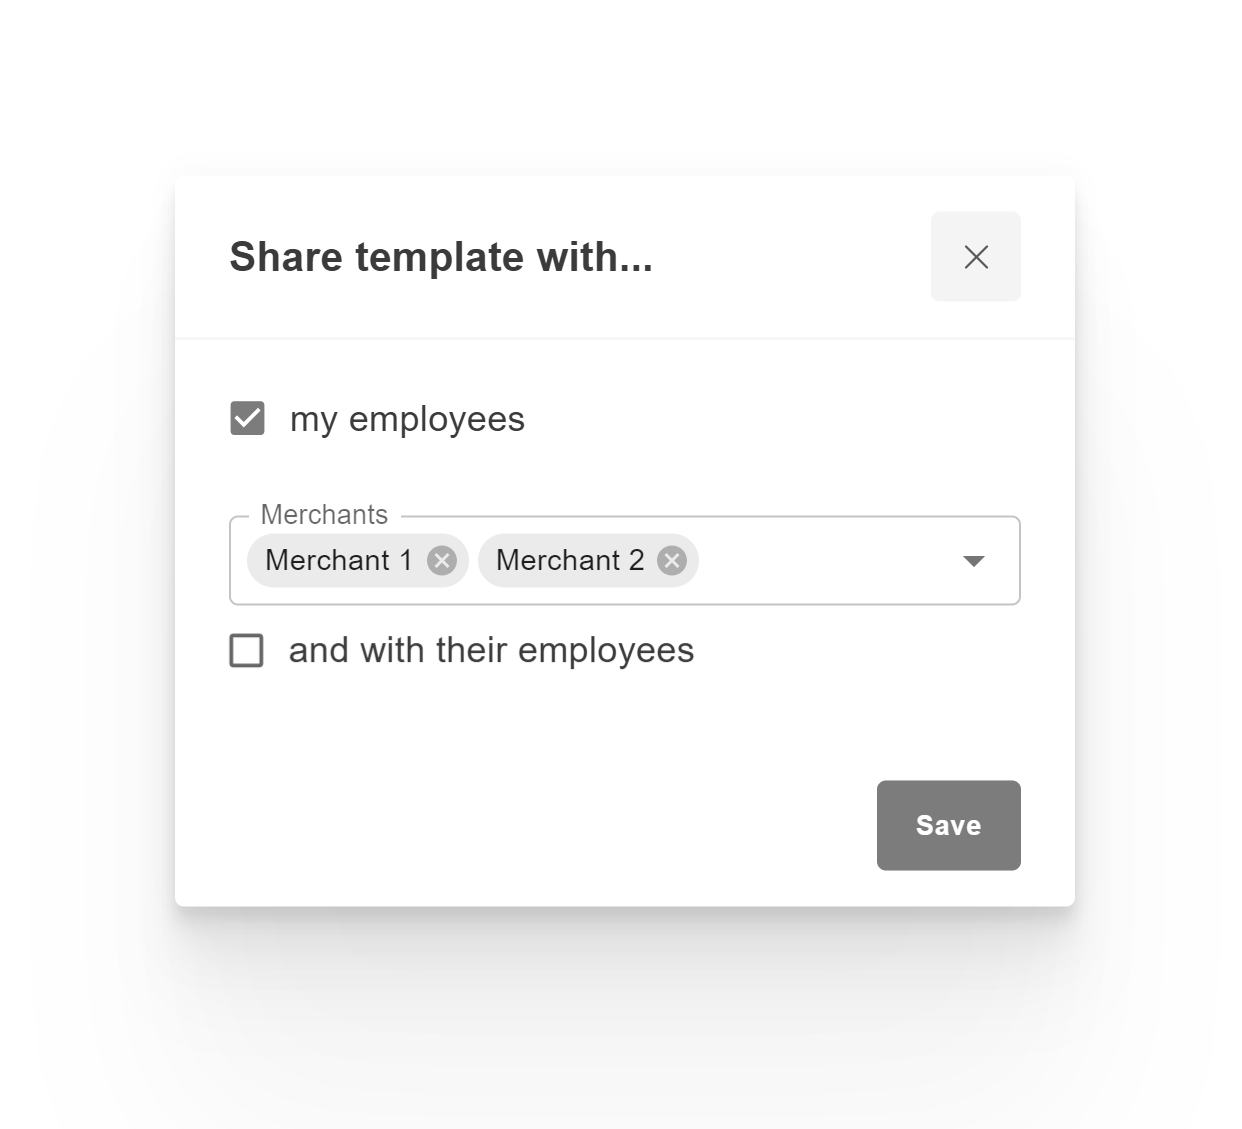
3) To edit, clone, delete or share, click three dots near the template name and select the desired parameter. The template can be shared with users at lower levels. This way, a merchant can share the template with their employees.

../_images/create_template_step_3.png

For all selected users, the created template will become the default upon loading the virtual terminal.
Changes can still be made before conducting a transaction, but only the creator of the template has the authority to modify the template itself. Users with whom the template has been shared are only allowed to make copies.
The number of created templates available for sharing is unlimited. They will all be displayed to users in alphabetical order.

../_images/create_template_step_3.1.png

Transaction Specification

Deposit

In the deposit section, it is possible to make a Sale and a Preauth transaction, which are described below.

Sale

Sale is a type of transaction, in which customer receives goods or services from Merchant in exchange for money or other assets.
To initiate transaction, submit the following 3 types of information:
1) Transaction data - Endpoint, amount, currency, description, invoice number must be filled directly on VT.
2) Card info - Cardholder, Card number, Valid thru:
- can be filled directly on VT;
- can be filled automatically together with Personal info, if Recurring ID is provided. If Recurring ID is provided and CVV field is empty, use “Copy link” to provide form to customer for additional confirmation. In case if it will be filled in VT form directly then transaction will be processed directly.
- can be filled by customer on the form.
3) Personal info - First name, Last name, City, Address, Zip code, Phone, E-mail, Customer IP-address ,Country, etc:
- can be filled directly on VT;
- can be filled automatically together with Card info, if Recurring ID is provided;
- can be filled automatically, if Customer ID is provided.

Process transaction:
- Use “Copy link” button to generate the payment link and send it to the customer. This flow is relevant for transactions which require additional information submitted by customer on the form (cardholder data, 3DS check, etc).
- Use “Process” button if transaction doesn’t require any additional information submitted by customer (e.g. noCVV non3D recurring transactions).

The image shows the options available for filling.

../_images/sale.png

Preauth

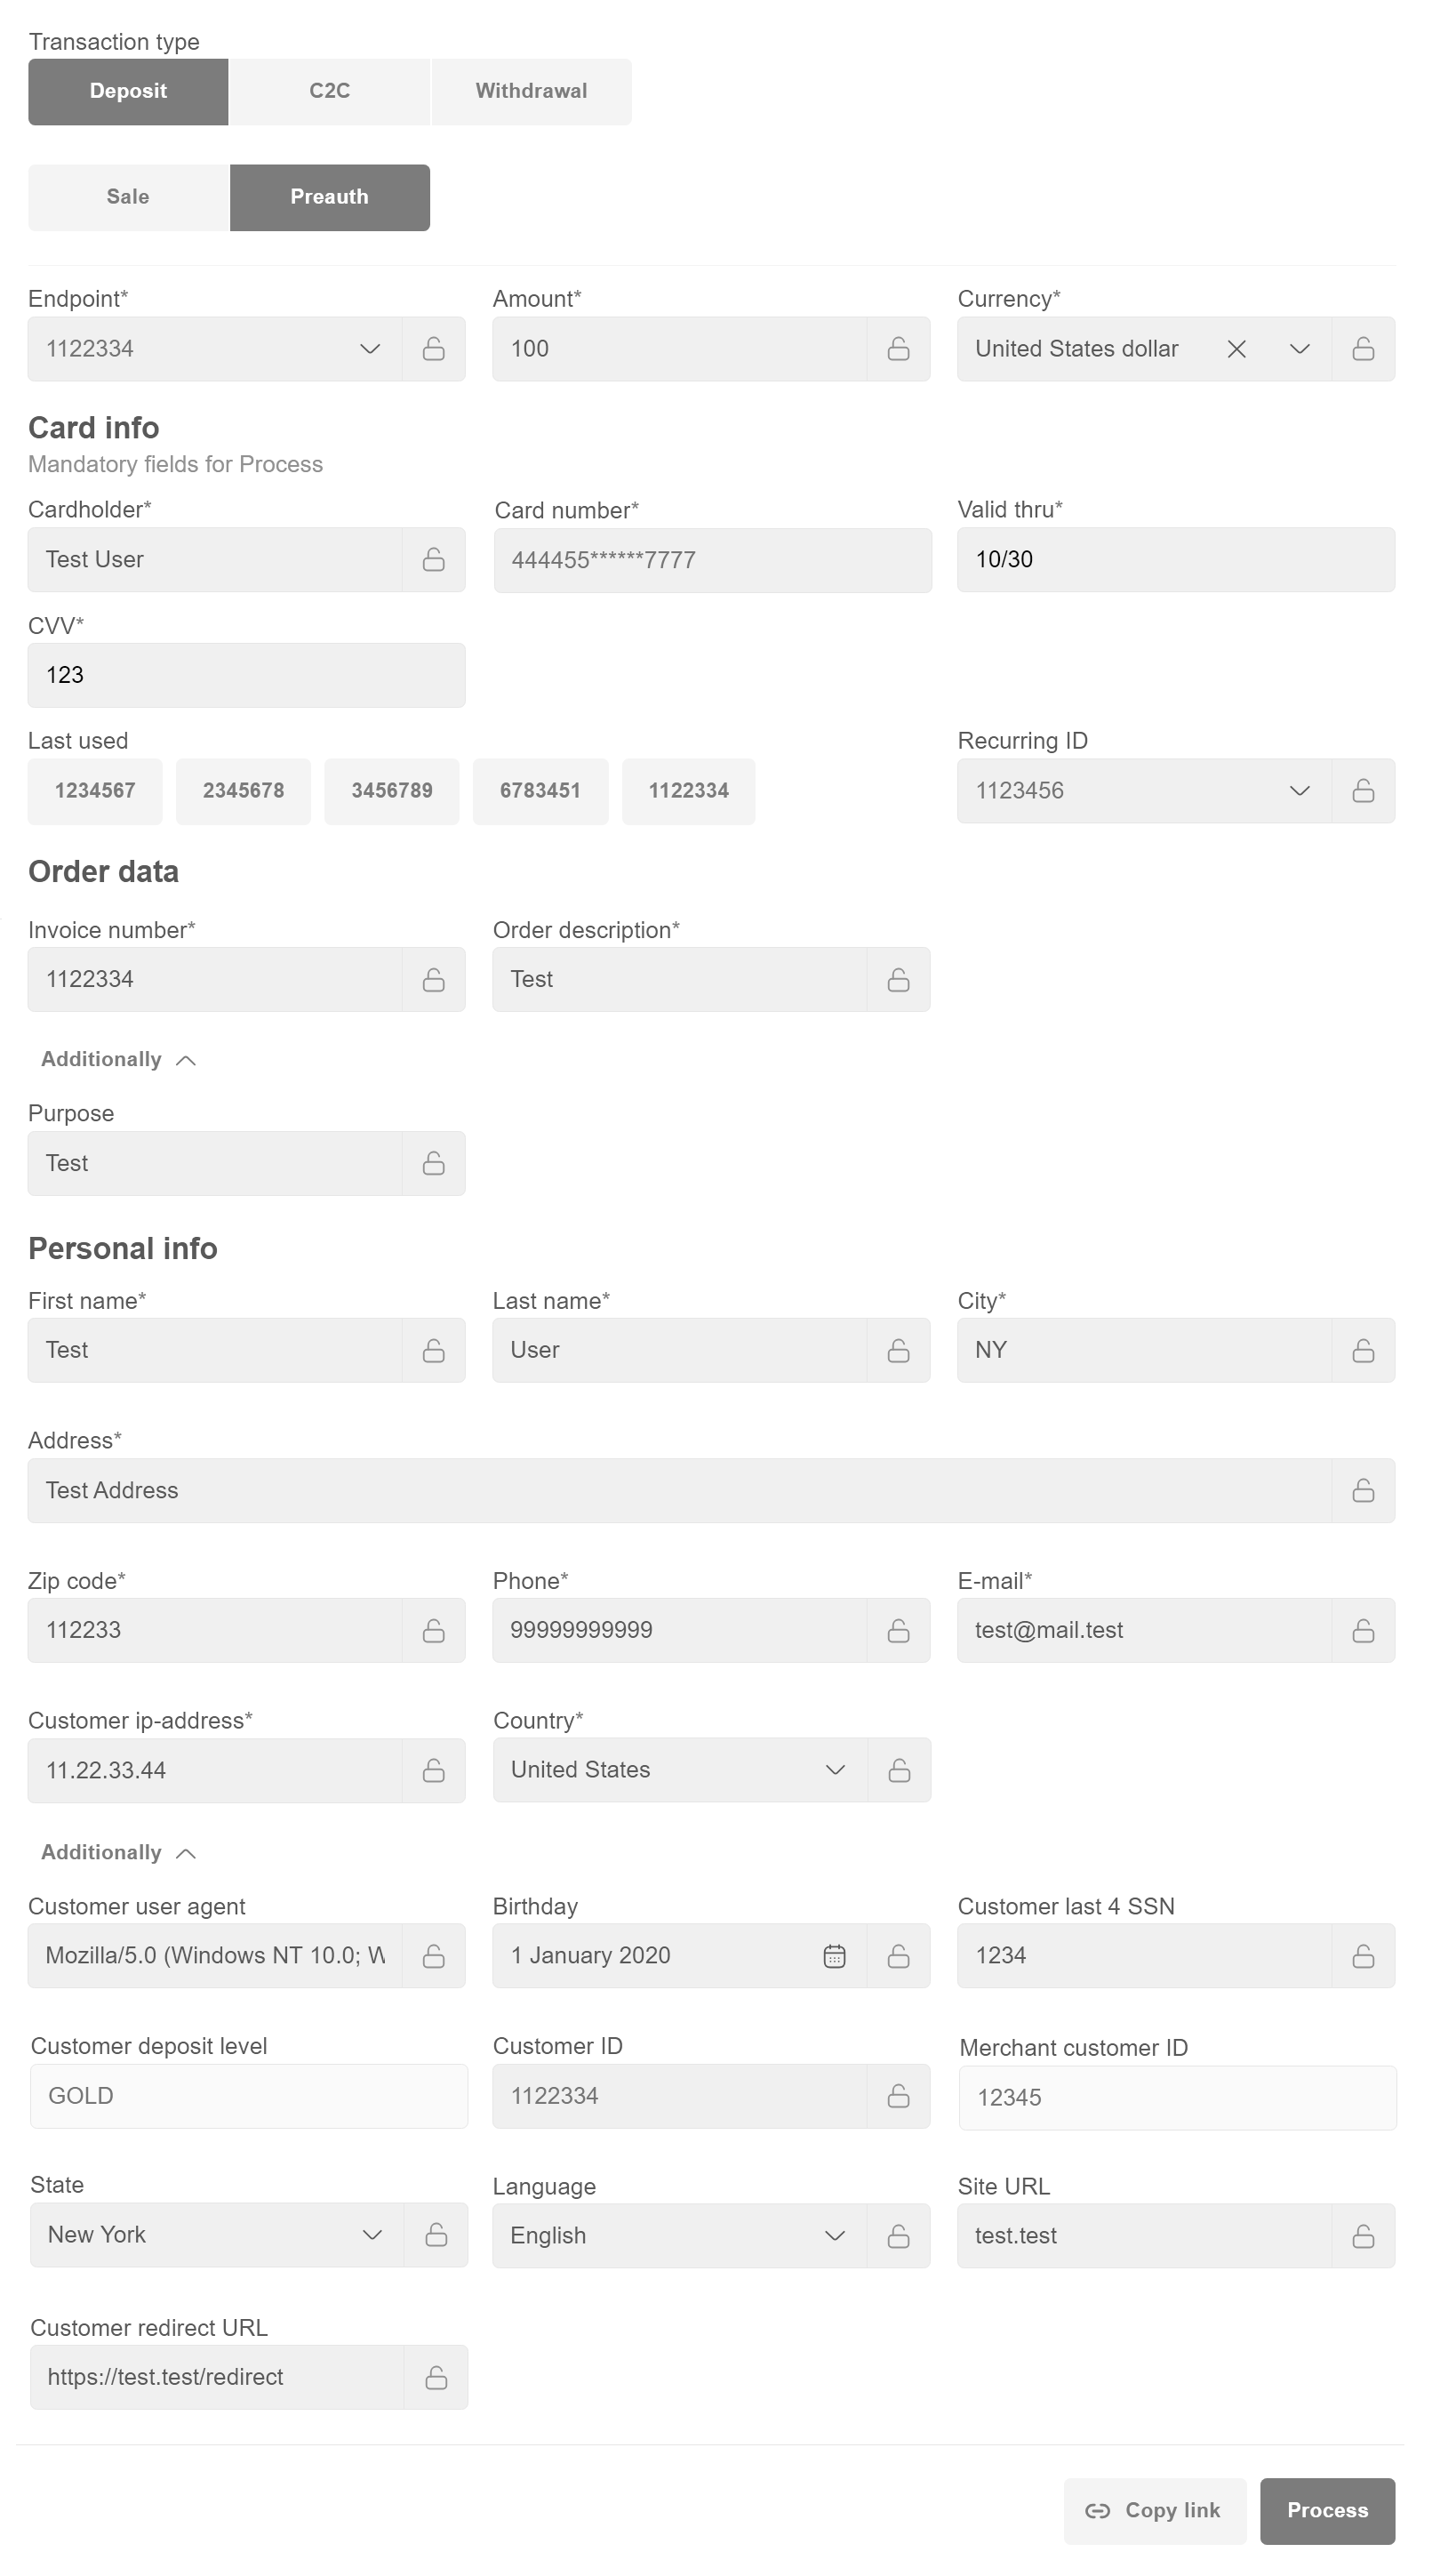
Pre authorization is a transaction type in which bank blocks the specified amount in the customer’s card account and does not allow the cardholder to use this blocked money.
It is important to know that the block remains for a definite period of time depending on whether this is a debit or a credit card (usually the maximum block period is 7 days for debit cards and 28 days for credit cards).
To initiate transaction, submit the following 3 types of information:
1) Transaction data - Endpoint, amount, currency, description, invoice number must be filled directly on VT.
2) Card info - Cardholder, Card number, Valid thru:
- can be filled directly on VT;
- can be filled automatically together with Personal info, if Recurring ID is provided. If Recurring ID is provided and CVV field is empty, use “Copy link” to provide form to customer for additional confirmation. In case if it will be filled in VT form directly then transaction will be processed directly.
- can be filled by customer on the form.
3) Personal info - First name, Last name, City, Address, Zip code, Phone, E-mail, Customer IP-address ,Country, etc:
- can be filled directly on VT;
- can be filled automatically together with Card info, if Recurring ID is provided;
- can be filled automatically, if Customer ID is provided.

Process transaction:
- Use “Copy link” button to generate the payment link and send it to the customer. This flow is relevant for transactions which require additional information submitted by customer on the form (cardholder data, 3DS check, etc).
- Use “Process” button if transaction doesn’t require any additional information submitted by customer (e.g. noCVV non3D recurring transactions).

The image shows the options available for filling.
../_images/preauth.png

C2C (Card To Card) Transfer

Card-to-card transaction is a direct transfer of funds from card to card (C2C).
Several scenarios are possible:
1) Transfer money from unknown card to registered card.
Receiver data is retrieved using Destination Recurring ID. The receiver Card info (Cardholder, Card number, Valid thru) and Personal info (First name, Last name, City, Address, Zip code, Phone, E-mail, Country and other optional customer data) sections will be filled in automatically. To speed up the filling of recipient fields, use the Last used section next to “Destination recurring ID” field, which contains previously used Recurring IDs. The Merchant creates a special link for the sender with “Copy link” button. The sender receives the link to a form in which he fills his card number, expiration date, holder name and CVV, then passes the 3DS check if needed.
2) Transfer money from registered card to unknown card.
Sender data is retrieved using Recurring ID. The sender Card info (Cardholder, Card number, Valid thru) and Personal info (First name, Last name, City, Address, Zip code, Phone, E-mail, Customer IP-address, Country and other optional customer data) sections will be filled in automatically. CVV is not stored and must be requested from sender. To speed up the filling of sender fields, use the Last used section new to “Recurring ID” field, which contains previously used Recurring IDs. The Merchant creates a special link for the sender with “Copy link”. The sender receives the link to a form in which he fills the destination card number, then passes the 3DS check if needed.
3) Transfer money between known or registered cards.
The Merchant fills the cardholder data or use recurring IDs for both sender and receiver of funds directly on VT and initiates transfer processing with “Process” button. In this case the transaction must be processed through the non3D channel, which is not common for C2C transfers.

Note

When filling in the Customer ID field, Personal info (First name, Last name,City, Address, Zip code, Phone, E-mail, Country) sections will be filled in automatically.
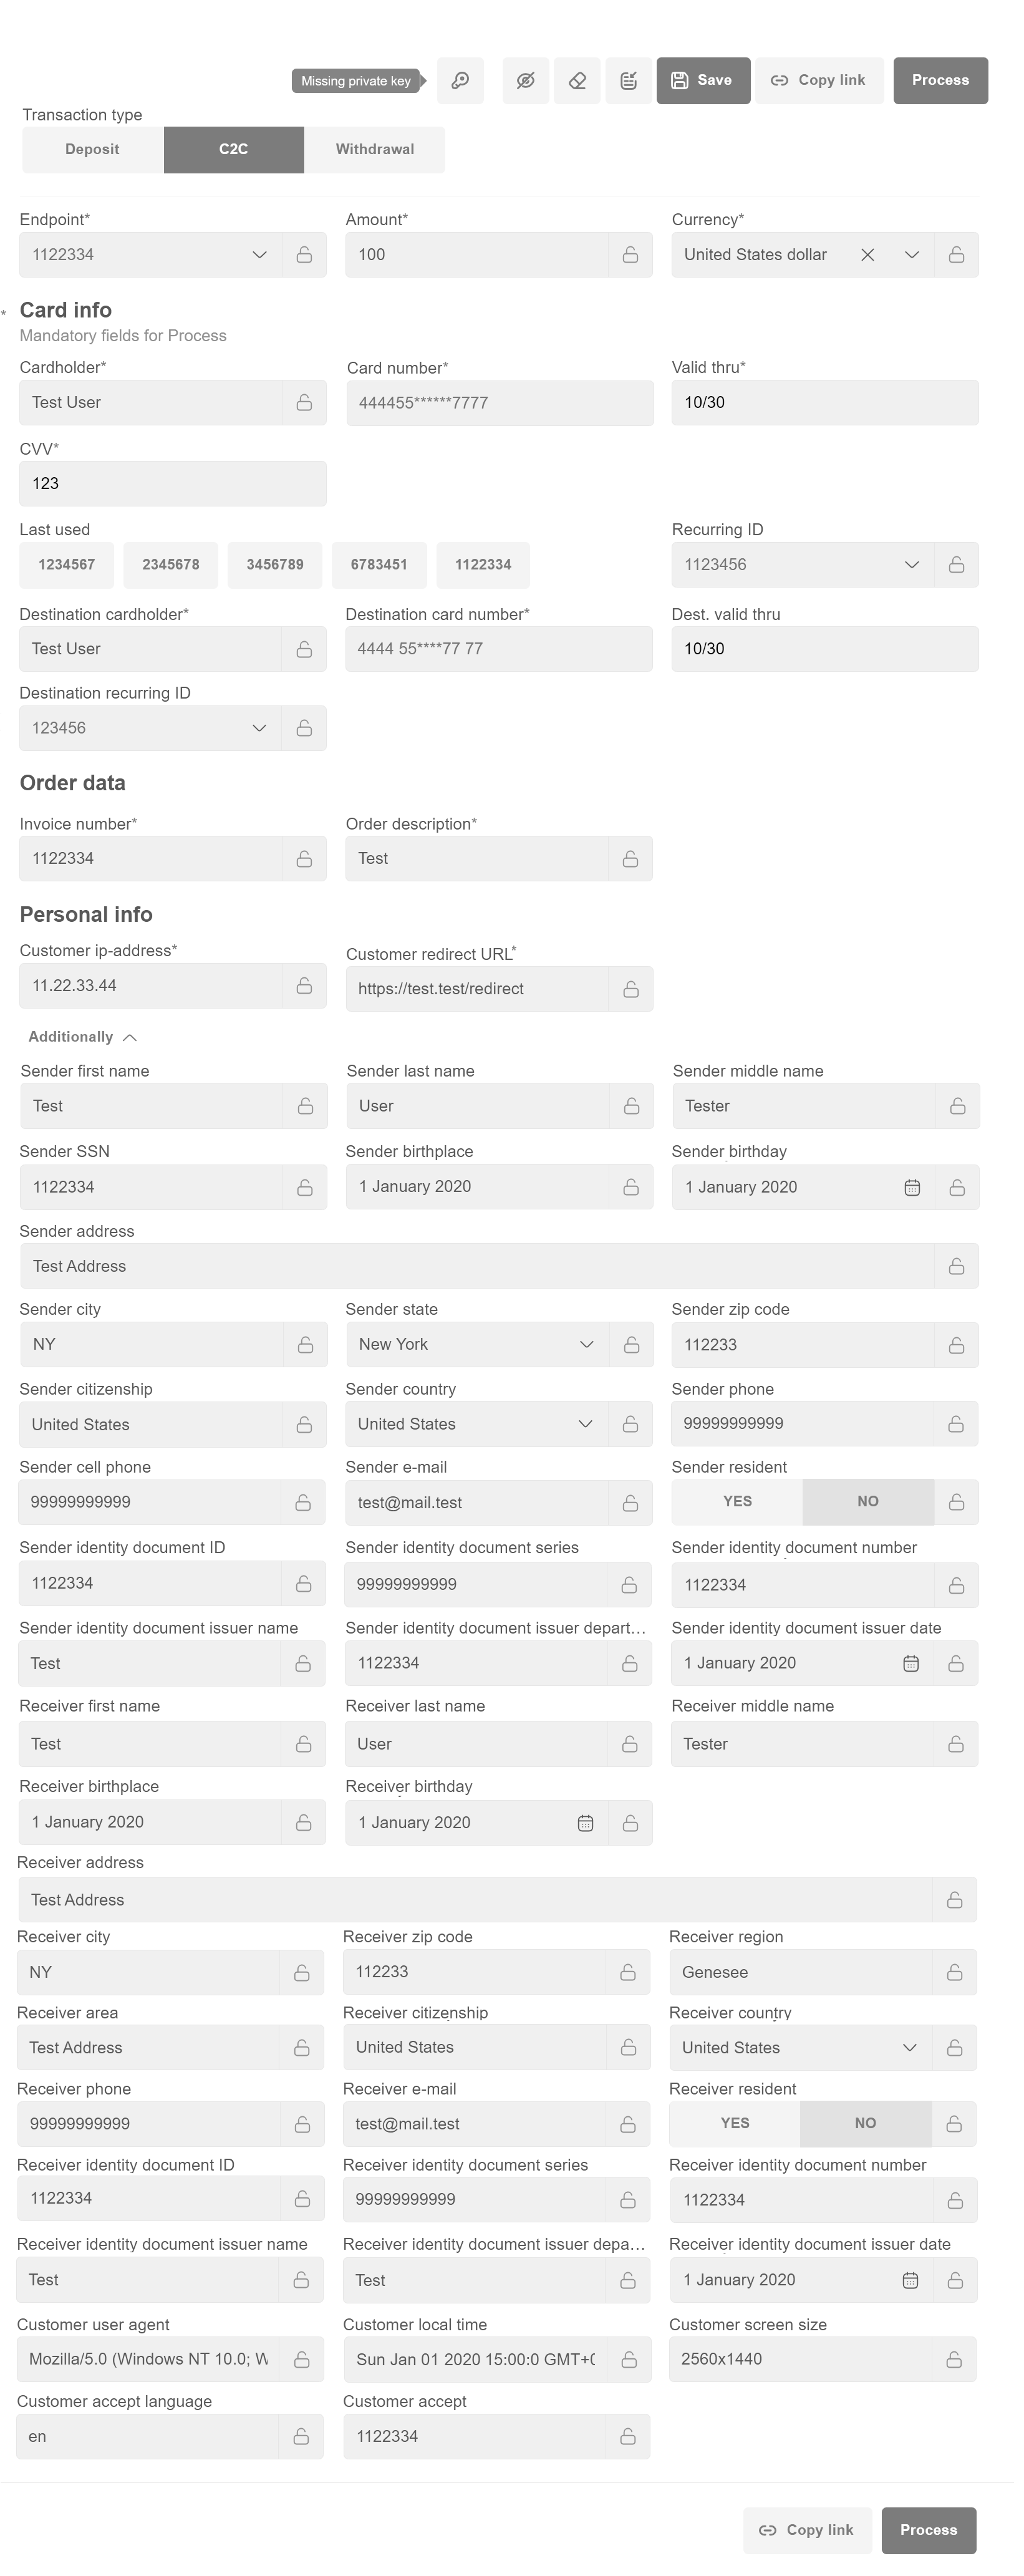

The image shows the options available for filling.

../_images/c2c.png

Withdrawal

In the withdrawal section, it is possible to make a D2C (Deposit to card) transfer and a Payout, which are described below.

D2C (Deposit To Card) Transfer

A Deposit-to-Card transaction is a transfer of funds from a bank account to a payment card.
Several scenarios are possible:
1) Transfer money to known card.
The Merchant fills the cardholder data for receiver of funds directly on VT with “Process” button.
2) Transfer money to registered card.
Receiver data is retrieved using Destination Recurring ID. The receiver Card info (Cardholder, Card number, Valid thru) and Personal info (First name, Last name, City, Address, Zip code, Phone, E-mail, Country and other optional customer data) sections will be filled in automatically. To speed up the filling of recipient fields, use the Last used section next to “Destination recurring ID” field, which contains previously used Recurring IDs.
3) Transfer money to unknown card.
The Merchant creates a special link for the recipient of funds with “Copy link” button. The recipient receives the link to a form in which he fills the destination card number.

Note

When filling in the Customer ID cell, Personal info (First name, Last name,City, Address, Zip code, Phone, E-mail, Country) sections will be filled in automatically.
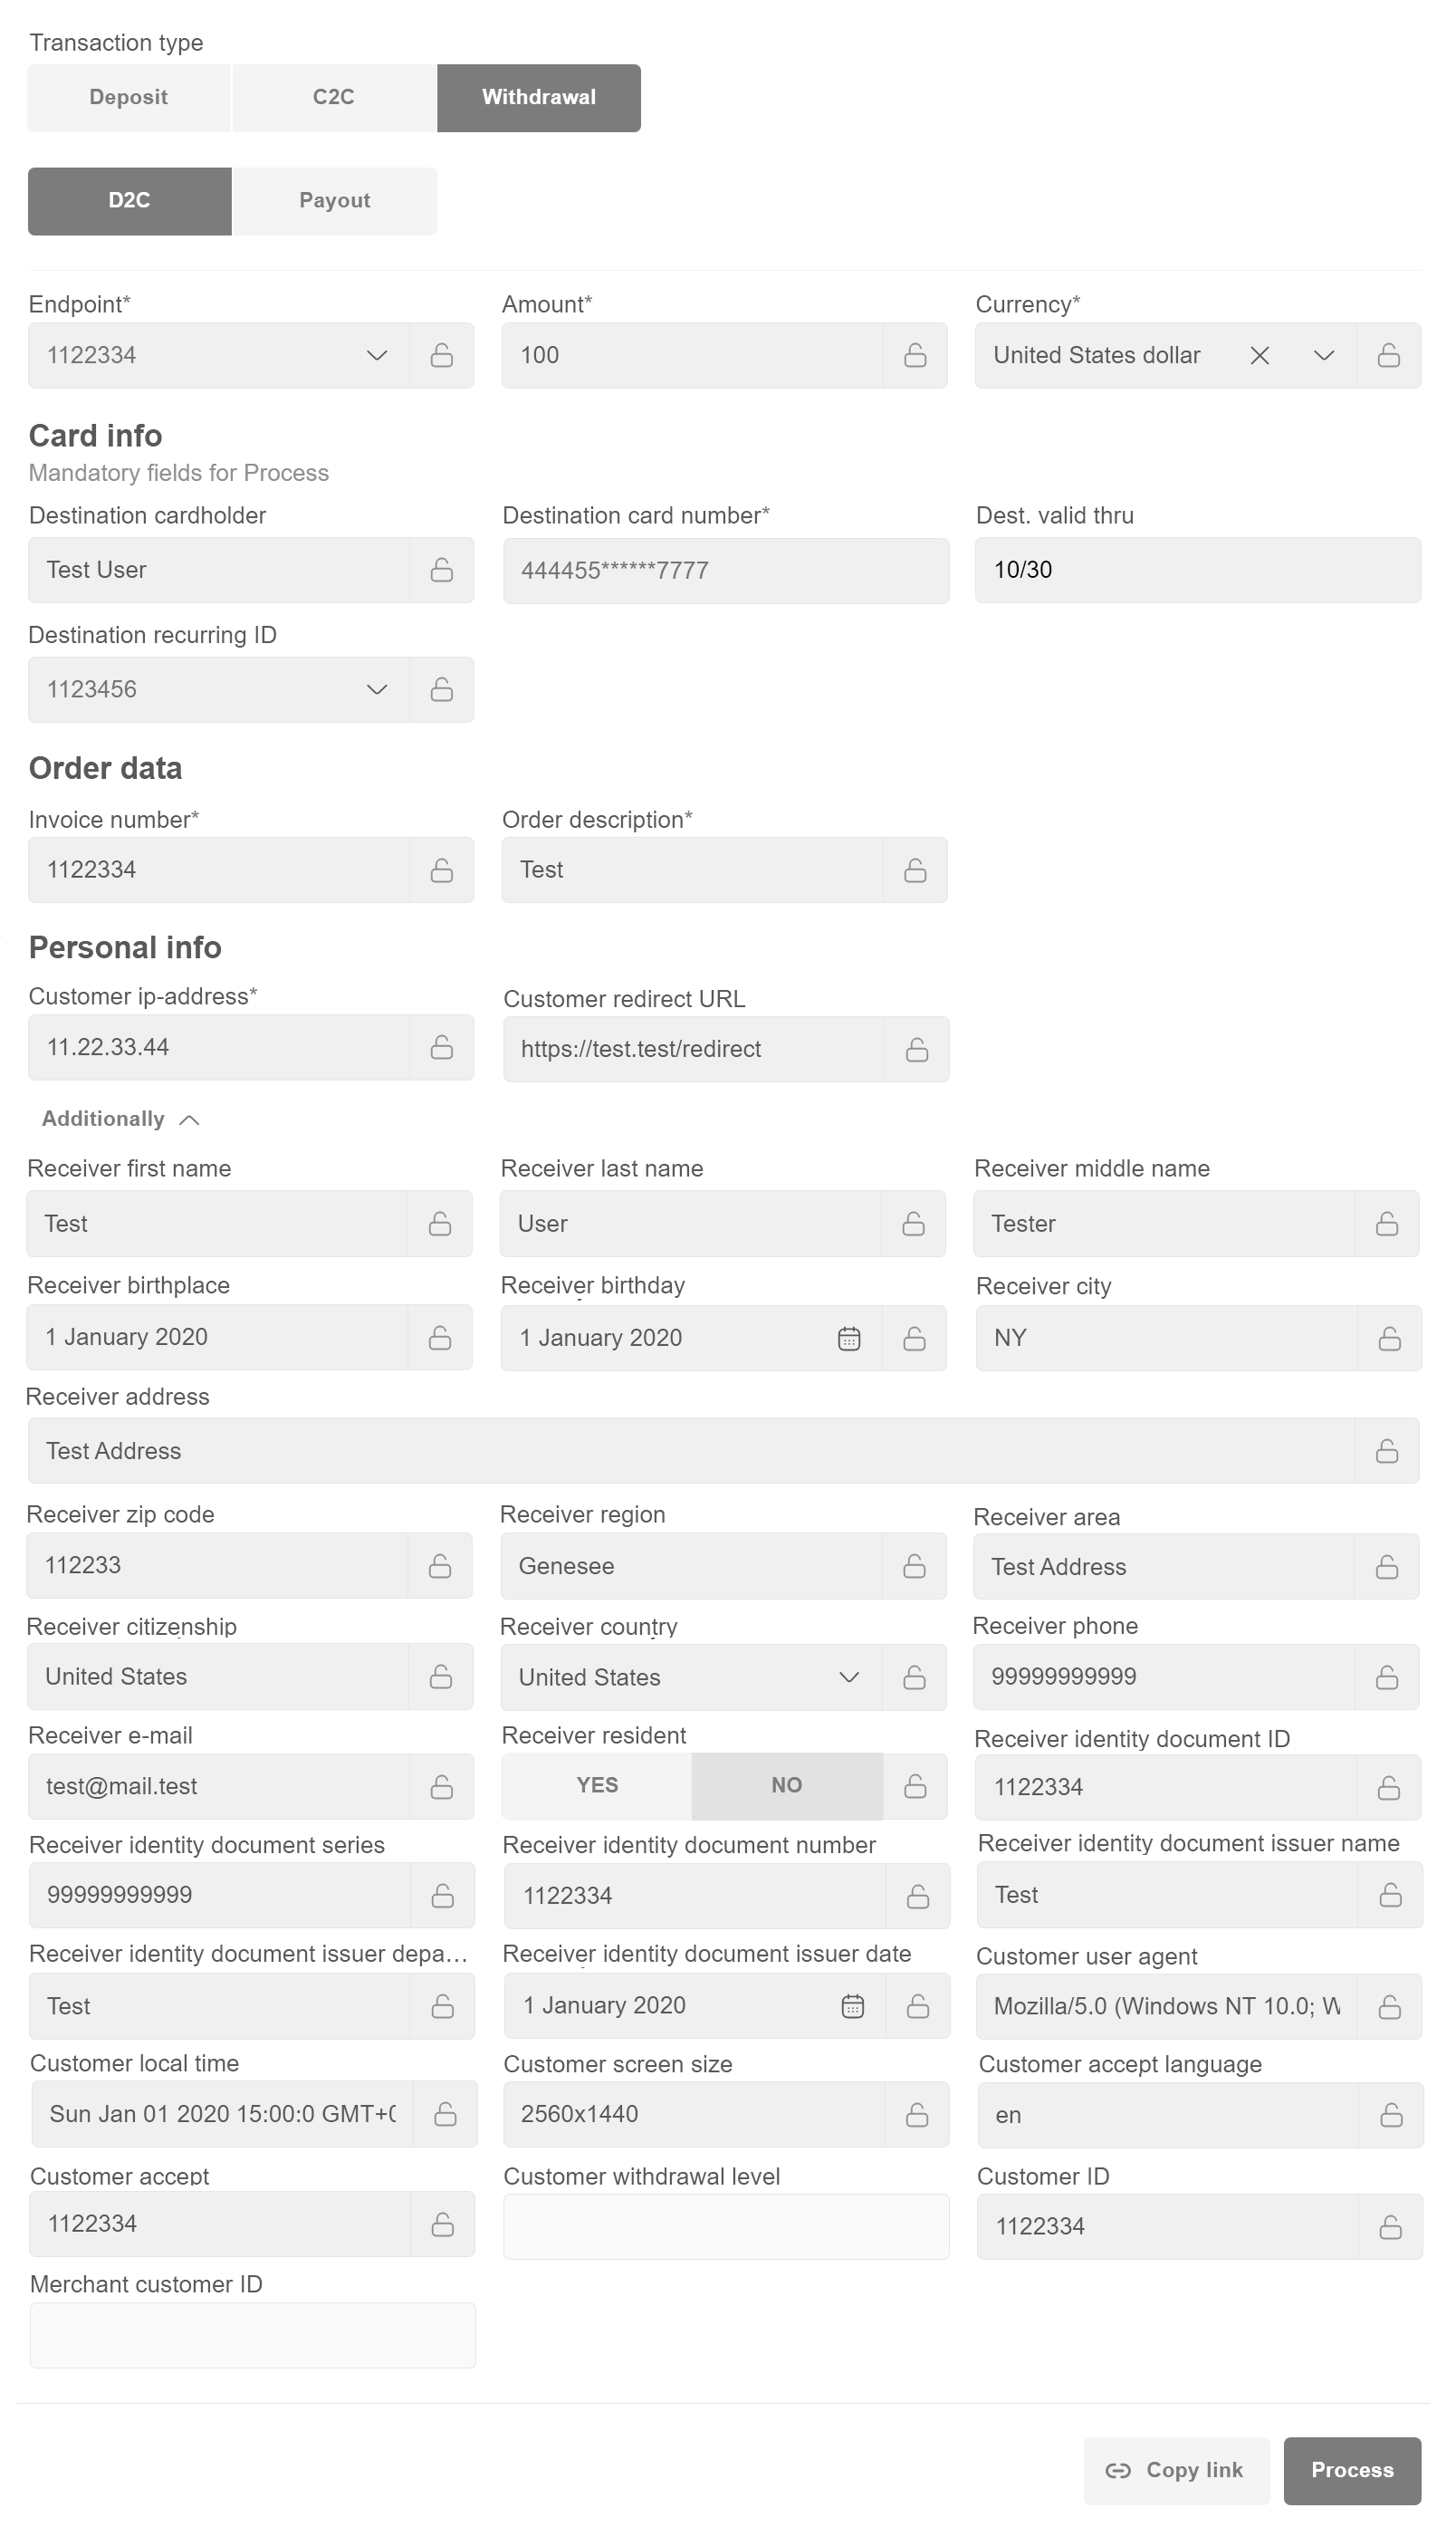

The image shows the options available for filling.

../_images/d2c.png

Payout

A Payout transaction is the disbursement of funds to a recipient account number, digital wallet or other type of account. The Merchant fills the payment data for receiver of funds directly on VT and initiates payout with “Process” button.

Note

When filling in the Customer ID field, Personal info (First name, Last name,City, Address, Zip code, Phone, E-mail, Country) sections will be filled in automatically.
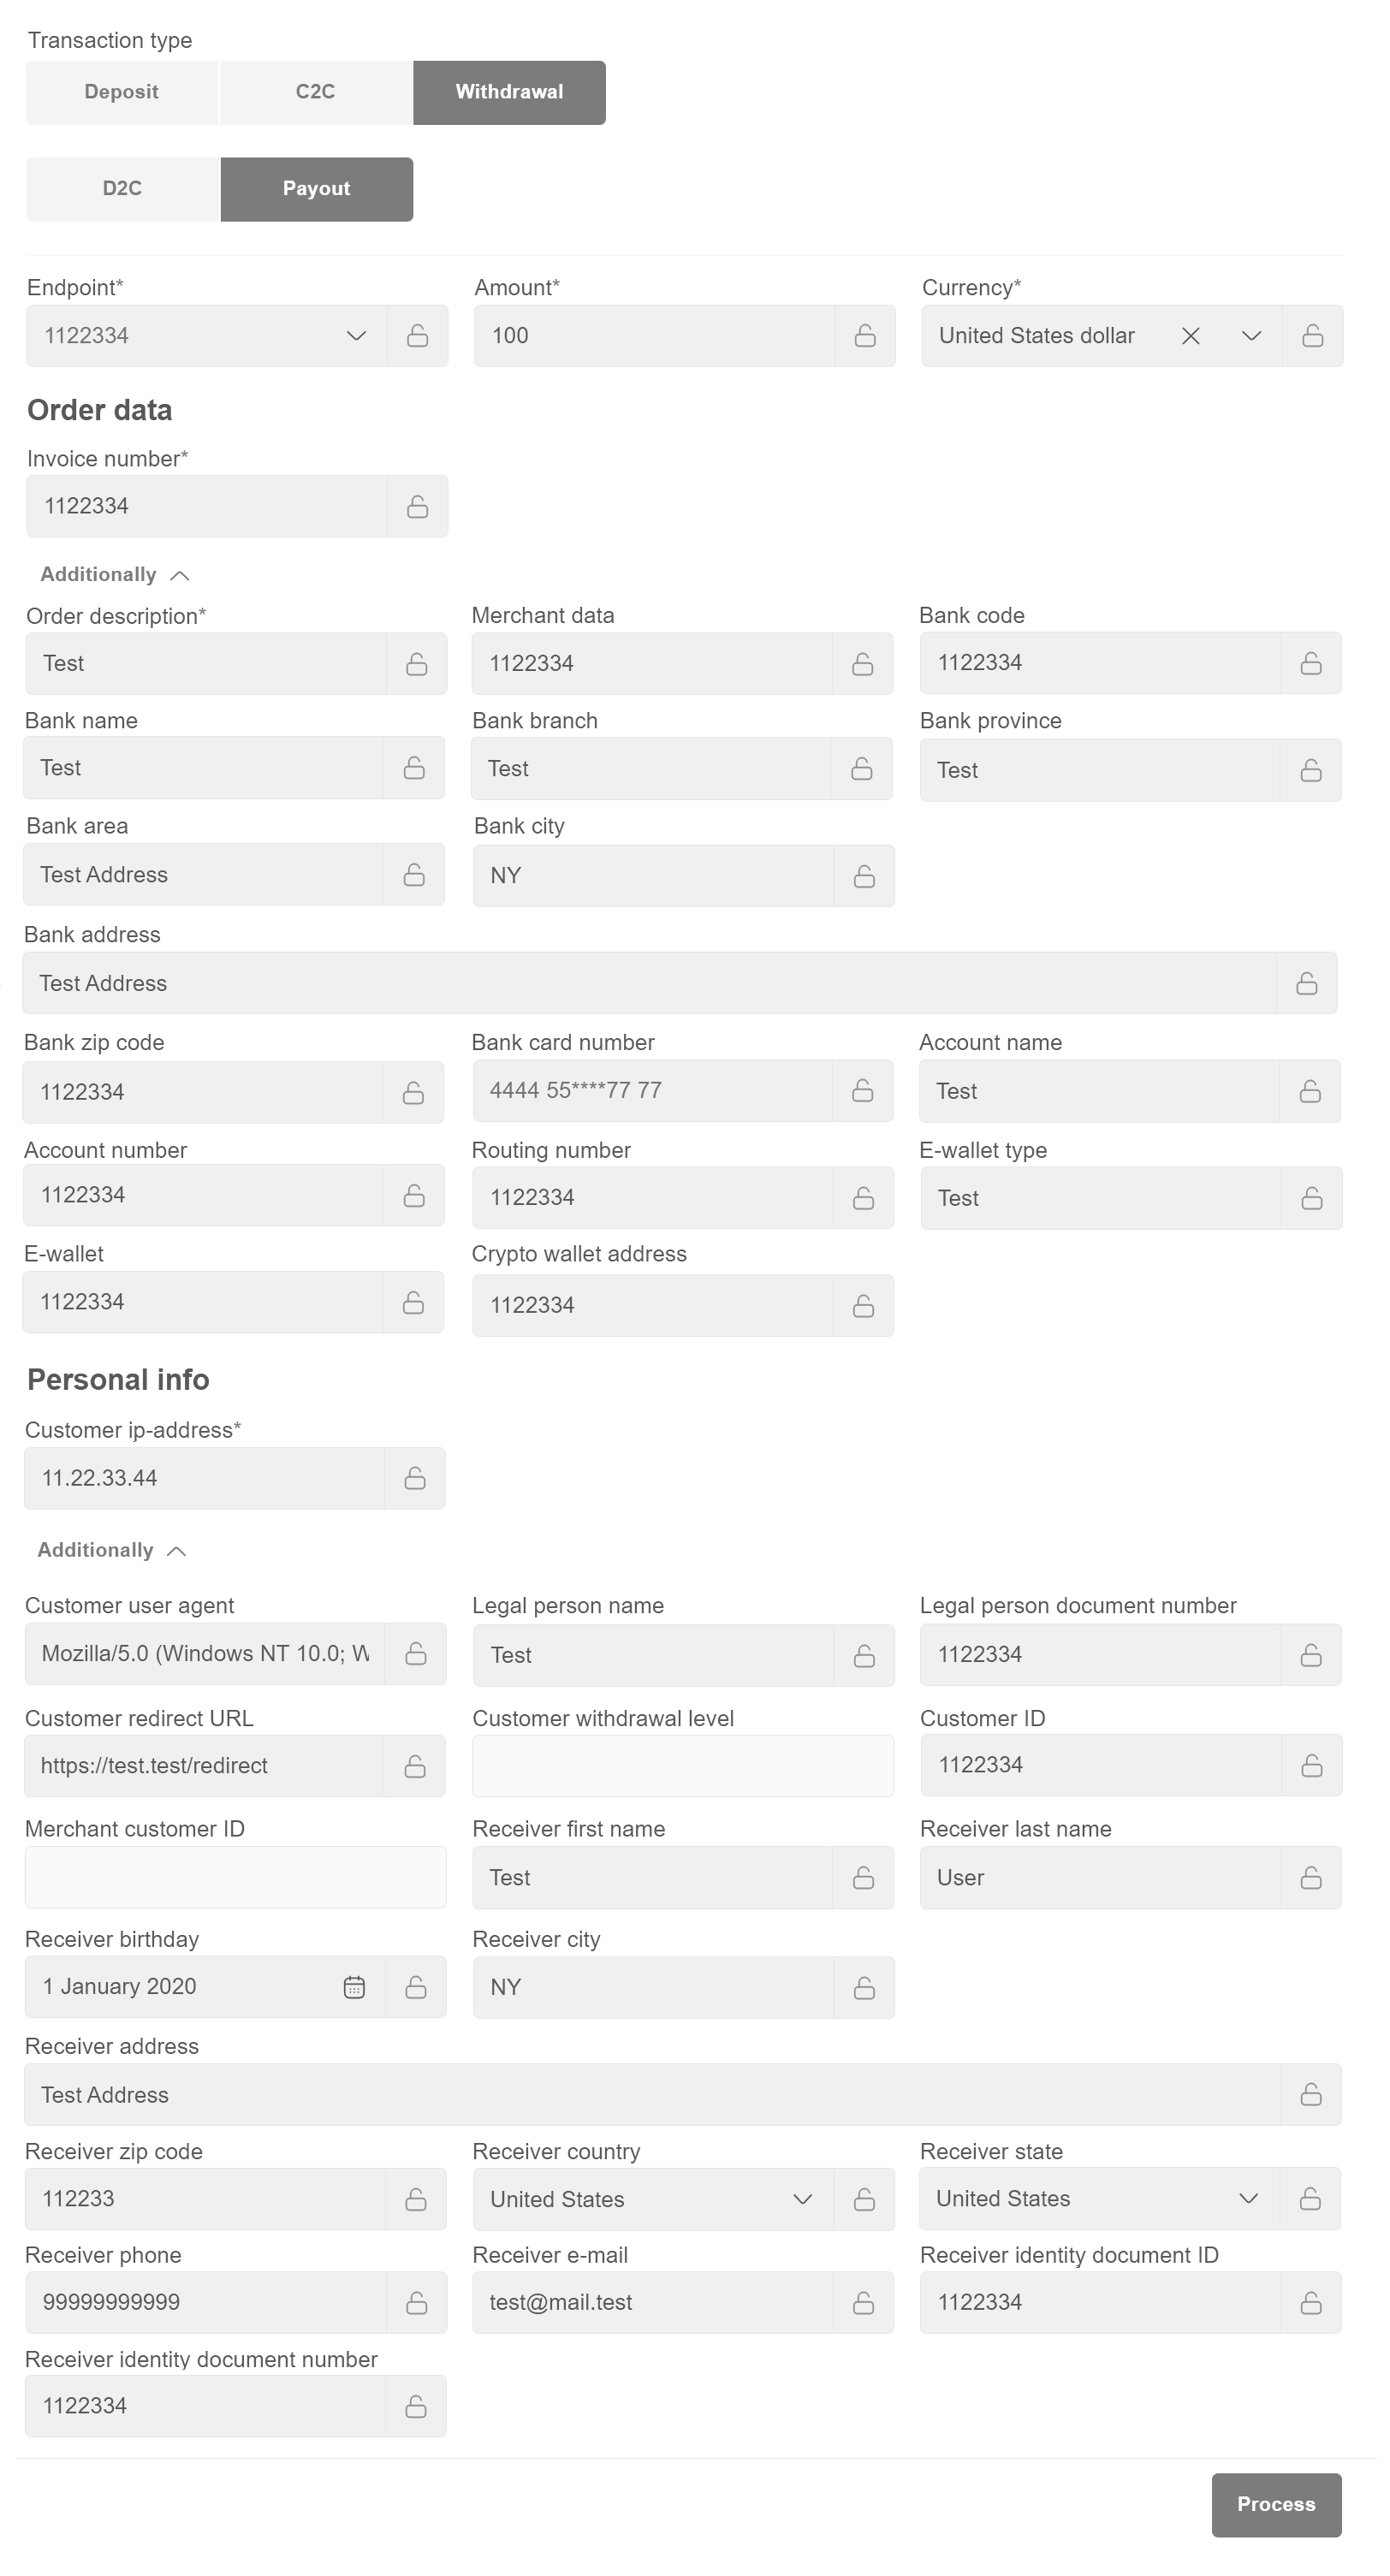

The image shows the options available for filling.

../_images/payout.png